Game Programming in Java
If you build it, they will play.
- Course Length: 4 weeks
- Course Type: Short Course
- Category:
- Technology and Computer Science
- High School
Schools and Districts: We offer customized programs that won't break the bank. Get a quote.
Anything can be made into a game. Games can be as complex as the Final Fantasy series and as simple as Filer, an app that shows you just how long it takes to cut through a metal bar with a nail file. (It's literally hours of entertainment.)
Anyone can play a game with the best filing graphics on the market, but making that game in all its metal-clipped glory? That's a totally different story. There's a lot to think about in game design, between the story, the animation, and all the underlying components (read: math) you might not even think about while buying fancy flower patterns for your digital nail file.
Luckily, this course is here to teach you all of game design's basic programming mechanics. Between the object hierarchies (which are usually called entity component systems), physics models, and audio and visual components, making a full-scale game takes a lot of time and energy. But by the end of this four-week course, you'll be ready to build with the best of them, thanks to our tutorials that help pull all those pieces together into a small racing game. Or at least they'll start out on your quest to write the best video game ever.
And don't forget to pack your nail file. It's dangerous to go alone.
Required Skills
Unit Breakdown
1 Game Programming in Java - Game Programming in Java
After this one-unit tutorial, you'll be able to make backgrounds, give the game characters, add in cool sounds and music, and even throw in a system that makes the user get points. You'll even get a points system in the activities to show how much XP you've gained in video game creation. (You're welcome.)
Recommended prerequisites:
Loading
Loading
Sample Lesson - Introduction
Lesson 1.07: Fun with Colors and Coordinates
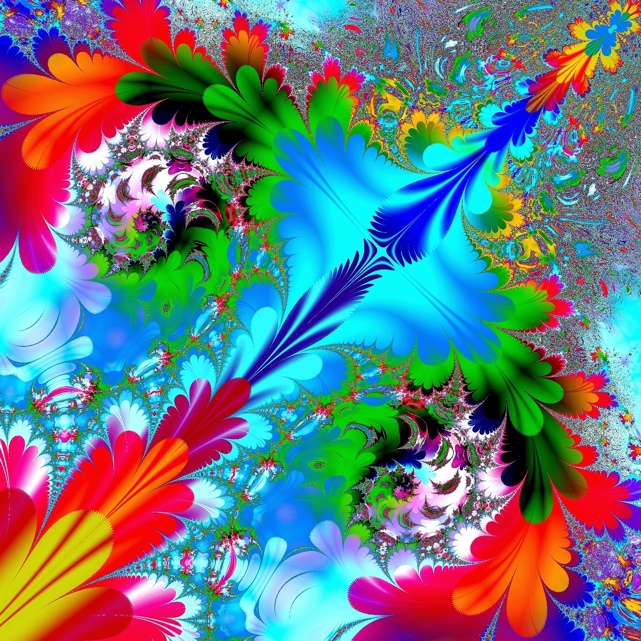
Pretty colors: half the reason anyone wants to do graphics programming. Or possibly more than half. Definitely at least half. (Source)
Everything comes back to pixels. These squares can only have one color, but get enough of them together and you can make up pretty interesting, almost life-like images.
Take a minute to think about your favorite game, whether it's The Sims, Call of Duty, Katamari Damacy, or Window Washing 5000. What's the first thing that pops into your head? Is it the entity model they use to represent how scum sticks on windows?
No, of course not. It's the graphics themselves: the beautiful pictures and animations developers make when they use all those single-color squares. To make a video game that sticks with people, you've got to harness the power of the pixel using the RGBA format. Once you've got that down, you'll be ready to actually place images in the game world—ideally without having to deal with each, individual pixel.
Making video games might be complex, but they aren't that complex.
Instead, you'll be drawing entire shapes. Basic shapes aren't exactly going to make your game the next Katamari or Window Washer, but they're useful for testing games before the artwork's done and ready to go.
In the meantime, be on the lookout for Window Washer 5001: The Windowing.
Sample Lesson - Reading
Reading 1.1.07a: Color Coordination
When you get right down to it, games are basically a bunch of colors on the screen (mixed with a little sound coming out of the speakers). The colors change (and the sounds, for that matter), but in the end that's literally all it is: one full screen (or window) of color at a time. But to go from what a computer understands (uh…binary) to what a person can piece together into images is going to take a solid understanding of how computers process color.
A computer monitor isn't the real world. Hmm, that doesn't make much sense. Let's explain. When you look out at a real-world object, your eyes see how different light frequencies reflect off of those objects and read them as colors. If you have a yellow plate or a pair of periwinkle light-up shoes, you're seeing those colors because of the way light waves hit the objects and reflect off them.
Monitors, on the other hand, pulse light directly into our eyes. We won't go into the technical details of how real-world color works (or how that could hurt your vision if it's in low-lighting and you're looking at it for hours on end), but suffice it to say, these are two very different things.
In the world of the monitor, color is represented by a 32-bit value with four channels:
- Red
- Blue
- Green
- Alpha
The first three? Those are the primary colors according to light, so if we mix them together, we can make any color we want—as long as it's within that 32-bit range.
Each of the four values takes up eight of the 32 bits, meaning they're 8-bit colors. In other words, each one has 28 or 256 possible values.
In the world of LibGDX, colors are objects we can set with a floating-point value from 0 to 1. A value of zero means none of that color, while a value of one means all of that color. Typically, RGBA colors are written as a list of these values in the order red, green, blue, alpha. So, the constructor Color(0.1, 0.2, 0.3, 0.4) means that
- red has a value of 0.1
- green has a value of 0.2.
- blue has a value of 0.3.
- alpha has a value of 0.4.
Red, blue, and green are pretty standard, but that alpha feels like the odd one out—especially since it isn't actually a color. Instead of adding in color, alpha is the transparency channel. It determines how much of the color behind the drawn color bleeds through to the top image.
An alpha value of 0 means that the image doesn't show up at all; it's completely transparent. In contrast, an alpha value of 1 means draw the color at 100% visibility so that it doesn't blend into the background at all. Here's an illustration of some possible alpha values with a cute little cuttlefish image over a water background.

Unless you're blending things together for an interesting effect, you'll usually want to use an alpha of 1 for your rendering and an alpha of 0 for parts you don't want to show up just yet.
This way of determining colors is called RGBA because…red, green, blue, and alpha. Here are the common colors you'll need. All. The. Time.
| Color | Color Constructor Parameters |
| Black | Color(0, 0, 0, 1) |
| 50% Gray | Color(0.5, 0.5, 0.5, 1) |
| White | Color(1, 1, 1, 1) |
| Red | Color(1, 0, 0, 1) |
| Green | Color(0, 1, 0, 1) |
| Blue | Color(0, 0, 1, 1) |
| Magenta | Color(1, 0, 1, 1) |
| Cyan | Color(1, 1, 0, 1) |
| Yellow | Color(0, 1, 1, 1) |
This might seem weird if you remember mixing colors from an art class, which brings up our point about painting with the monitor vs. painting with the real world. In the real world, we start with red, blue, and yellow, then mix to get other colors. Since we're starting with red, green, and blue on the computer, the mixing's a bit different.
You can experiment with a color picker to mess with color combos, but keep in mind that the R, G, and B span 0 – 255. You can get rid of this issue by dividing the values of all the colors by 255 to get an approximate decimal.
Handy, right?
Of course, if you don't feel like playing swatches, you can always just use some built-in color constants. The Color class comes with a slew of built-in colors that are static final fields. So, for instance, Color.RED is the same as new Color(1, 0, 0, 1). These are useful for basic colors, but if you want more control, you'll have to specify the RGBA values with a new Color object.
You do you when it comes to color—and everything else in life, really.
Sample Lesson - Reading
Reading 1.1.07b: Shaping the World We Game In
As fun as it is to constantly create patchworks of colors that rival a scene from Joseph and the Amazing Technicolor Dreamcoat , sometimes colors aren't enough. Sometimes you need to actually make shapes show up on the screen.
Even though game art is a field in and of itself, many games utilize basic shapes to save resources. If you can use a circle for a projectile, it saves
- the artist time to work on more important art.
- The budget because you don't have to pay the artist to draw a circle when the game engine gives you options for automating that one.
Plus, most graphics come about from manipulating a shape. Anything fancier is usually just slapping an image on that shape. So, not only can you save time (and budget) by using shapes, a lot of the ideas behind drawing shapes also applies to other kinds of game graphics. And with a strong grasp of computer color, you can do all sorts of neat effects.
But first, let's talk about how the monitor's laid out.
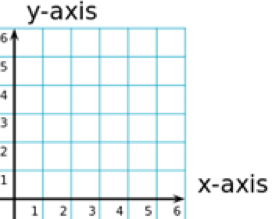
The Cartesian Plane
Two-dimensional graphics are laid out on a grid called a Cartesian plane, which you probably know from any algebra-based math class. If you've ever seen a graph in math—or played Battleship, for that matter—chances are good you're looking at a Cartesian plane that breaks space up into squares.
(Source)
Depending on the system, though, the coordinates could look very different, despite almost all of them using an x coordinate to mark out the width and a y coordinate to mark the height.
In both math and LibGDX, you'll "walk along the street, then climb up the ladder" to find the x value and then the y value. In other words, numbers increase going right on the x-axis and up on the y-axis. For example, the position (10, 10) is to the upper-right of (0, 0). Some systems make y start 0 at the top and get larger as you move down, but they aren't here, so we're just going to pretend they don't exist.
Cool? Cool.
Drawing Primitives
In fancy computer-speak, we refer to basic shapes as primitives to distinguish them from more complex images. LibGDX calls them shapes, though, and its built-in tool for drawing them is called ShapeRenderer.
For the sake of fast performance, ShapeRenderer batches its draw calls. Batching is a technique where a whole lot of calculation is done upfront to figure out what to draw before all the drawing gets done at the same time. Drawing is pretty slow, so it's best to minimize the number of times it happens with this wait-till-the-last-millisecond approach.
There are two basic options for shapes: line and filled. They're both going to draw the shape, except line shapes only go for outlines while filled shapes fill the shape in with a color.
As for shapes, you have a whole slew of options:
- Arc
- Circle
- Cone
- Curve
- Ellipse
- Line
- Point
- Polygon
- Rectangle (called rect)
- Triangle
Almost all of these shape names are also the name of the method in ShapeRenderer that draws that shape to the screen. The only exception is rectangle, whose method is rect().
We aren't going to ask why and neither should you.
Each of these methods takes a different list of arguments to define its shape. We'll only worry about circle and rectangle for now.
In addition to drawing shapes, ShapeRenderer allows you to set the color of the shapes using the cleverly-named method, setColor(), which takes—guess what—red, green, blue, and alpha arguments to set the RGBA color of all the following shapes.
You'd think that if it's given an alpha value, it would set the transparency based on what we asked, but you'd be wrong. Shapes are always drawn at an alpha of one because sometimes no one cares what you think about alpha. Despite the blatant neglect of alpha, it's best to write in an alpha of 1 so the code matches the result.
You're also more than welcome to passive-aggressively write in the comments about how annoying it is that you're forced to make it alpha of 1 if you want. Just, for the record.
Shapely Examples
Before we can do anything, we need to make our own instance of the ShapeRenderer class. We need a couple imports at the top of the class:
import com.badlogic.gdx.graphics.glutils.ShapeRenderer;
import com.badlogic.gdx.graphics.glutils.ShapeRenderer.ShapeType;
Then, we add a ShapeRenderer to our game class:
private ShapeRenderer shapeRenderer;
Then it's going to get initialized it in our game's create method:
shapeRenderer = new ShapeRenderer();
And just like that, you're ready to start rendering in the render method.
Let's start with rectangles. The rect method takes four arguments:
xto mark the rightmost point of the rectangleyto mark the bottommost point of the rectanglewidthto mark out how far left it spansheightto mark out how far up it spans
Let's draw a blue rectangle outline from (100, 100) to (300, 300) on the screen. This goes in our render() method because it needs to be redrawn every frame. (We'll talk about why in the next lesson, but just know that it happens.)
shapeRenderer.setColor(0, 0, 1, 1);
shapeRenderer.begin(ShapeType.Line);
shapeRenderer.rect(100, 100, 200, 200);
shapeRenderer.end();
Check out that begin method. It's going to specify that we're drawing an outline. We also need the end method, or else the batch doesn't get drawn. Also: symmetry (maybe).
The circle method's going to look about the same, except it takes three arguments:
xfor the center x coordinateyfor the center y coordinateradiusfor the radius (which is half the diameter, FYI)
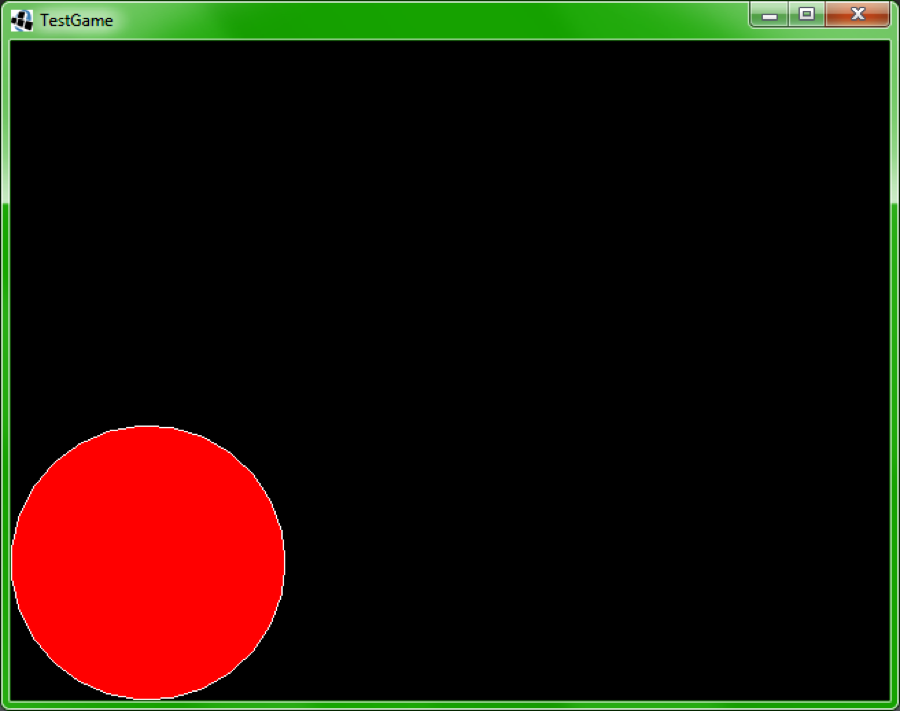
Let's draw a green, filled circle. Again, this goes in our render method.
shapeRenderer.setColor(0, 1, 0, 1);
shapeRenderer.begin(ShapeType.Filled);
shapeRenderer.circle( 100, 100, 100 );
shapeRenderer.end();
Shapes are also layered in the order that you draw them. If you use that fact to your advantage, you can make a neat outline effect by drawing a filled shape, then drawing the same shape as a line shape on top—in a different color. For instance, the following code draws a red filled circle, then a white line circle to give it an outline.
shapeRenderer.setColor(1, 0, 0, 1);
shapeRenderer.begin(ShapeType.Filled);
shapeRenderer.circle( 100, 100, 100 );
shapeRenderer.end();

shapeRenderer.setColor(1, 1, 1, 1);
shapeRenderer.begin(ShapeType.Line);
shapeRenderer.circle( 100, 100, 100 );
shapeRenderer.end();
The result is pretty nifty.
From there, you can make some pretty cool graphics, so don't be a stranger to the shapes in the activity coming up soon.
And by "soon," we mean "now."
Sample Lesson - Activity
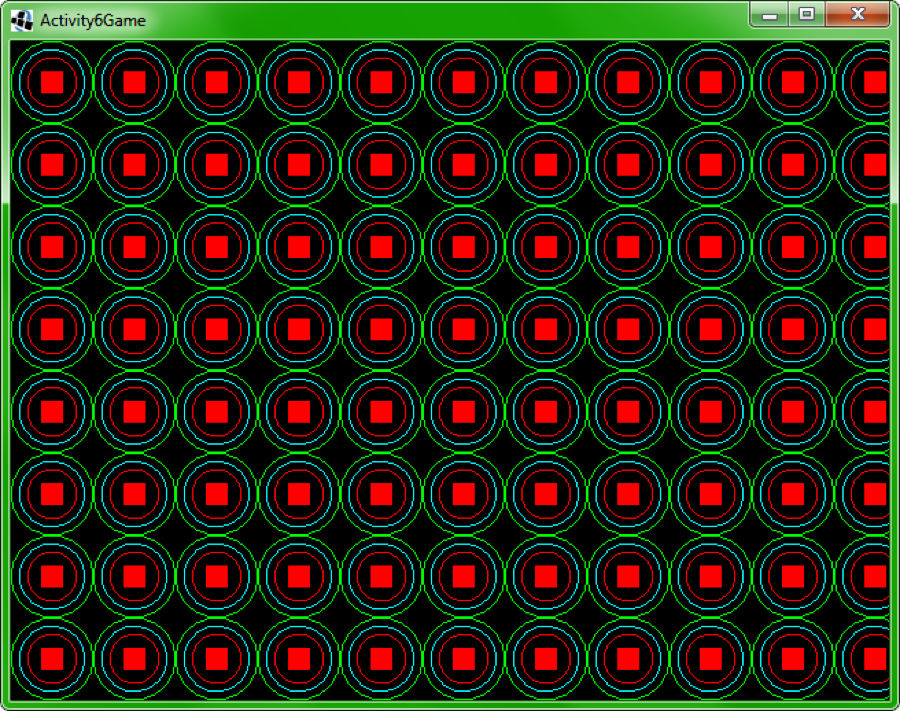
Activity 1.07: Shapes and Colors
Stare at the following image for about twenty minutes. Aha! We have you under our mind control now.

No, we're kidding. Please don't stare at the image for too long. Seriously, it's way too intense, like one of those Magic Eye things minus the interesting aftereffect. Staring at this image won't do anything except burn circles and squares in your retinas.
Although it's neat that the squares don't look perfectly square, don't you think? Regardless, this image is what you'll be making in this activity, so you can hypnotize your friends.
Again, we're kidding. Don't go around trying to hypnotize people; that stuff should only be left to the experts.
Step One
Make a new LibGDX project. Call the game Activity7Game and put it in the com.yourname.activity7 package.
(You already knew that one by now, though, right?)
Get rid of everything in the game class except the methods create(), render(), and dispose(). Make a ShapeRenderer object as a field of the Game class and set it to a new ShapeRenderer in create().
In the render method, start the ShapeRenderer in line mode. To do that, use the begin method like we showed you in the reading and pass in the proper value to begin drawing line shapes. Add an end method to close out the drawing section, just for good measure.
Step Two
Between the begin() and end() you so neatly laid out in your render method, create a nested loop. The outer loop should iterate a variable called x between 30 and the maximum width of the screen (which you should be able to grab with the gdx.graphics.getWidth method), and the second should iterate a variable called y between 30 and the maximum height of the screen (again, using gdx.graphics, but this time with the getHeight method). Each loop should increase by 60 each step.
Why? We like the number 60, is all.
Inside your pair of loops, draw the three circles for the pattern:
- A green circle with a radius of 30 at (
x,y) - A cyan circle with a radius of 24 at (
x,y) - A red circle with a radius of 18 at (
x,y)
Before you move on, be sure to run the code and make sure it looks like the image above, minus the rectangle in the center of each circle.
Step Three
Time to start fresh. Create a new pair of begin and end methods with your ShapeRenderer, but this time use the shape type for filled shapes. Inside, make another set of loops just like the ones in the previous steps.
Inside your filled shape loops, draw a red rectangle centered at ( x, y) with a width of 16 and a height of 16. Don't forget that the arguments to ShapeRenderer's rect method are for the lower-left corner and its size—not the center.
Check that your result is as close a match to the picture as you can get. Hypnotized yet? No, really, don't stare at it for too long. We haven't tested the long-term effects.
Go ahead and submit your code.
Short Programming Assignment Rubric - 25 Points
- Course Length: 4 weeks
- Course Type: Short Course
- Category:
- Technology and Computer Science
- High School
Schools and Districts: We offer customized programs that won't break the bank. Get a quote.